Displacement of points with same coordinates, ShiftPoints/OGR
по адресу http://gis-lab.info/qa/point-displacement-eng.html
Tools for perform displamecement of points with same coordinates.
One of the problems we encountered while working on the "Elections map": several points — Election Commissions — may have the same address and as result the same coordinates. So these points become overlapped and only information for upper point is available.
The obvious solution of this issue — move overlapped points at small distance, that they all become visible. Moving all points by hands is not an option if you have many and it is difficult to keep the same distance between points.
"Point displacement" renderer in QGIS only works in render-time and doesn't update features itself.
After all we developed a small script to solve this problem, and later also QGIS plugin based on it.
| Made by | Opensource GIS development and projects |
Script for Python/OGR
Preparation
To use this tool you need our python script, Python 2.5 or higher and GDAL library with Python bindings.
The simplest way to get all necessary components under OS Windows is to use OSGeo4W installer:
- download OSGeo4W installer.
- run the installer
- select «Advanced install» and press «Next»
- select gdal and gdal-python packages (under Libs category), then press «Next»
- wait while requested packages and their dependencies are installed
If you run Linux, then install all necessary packages using your package manager. In Ubuntu/Debian you need to install python-gdal package.
Extract the script from archieve and copy displacement.py into any directory in your PATH (for example, into C:\Tools\GIS or ~/bin). To run the script under Windows, you need to open OSGeo4W shell and run the script from the shell.
Usage
There is no graphical interface for the script and it runs in console mode at the moment. It takes two arguments as input and output. Also there several options for tuning
displacement.py [OPTIONS] INPUT_FILE OUTPUT_FILE
- INPUT_FILE — input point shapefile
- OUTPUT_FILE — output file
Options:
- -d DISTANCE, --distance=DISTANCE — displacement distance. IMPORTANT! It is necessary to use for distance same units as input shapefile used. For example, if shapefile in decimal degrees than distance also should be in decimal degrees.
- -r, --rotate — flag option. If used then two overlapped points will be shifted in horizontal direscion, otherwise — in vertical direction. Default value is False, so points will be shifted points moved vertically.
- -l FILE, --log=FILE — file where ID's of overlapped points with field values will be written. Used together with option "-f"
- -f FIELD, --field=FIELD — name of the shapefile field, which value will be added to log file. Used only together with option "-l"
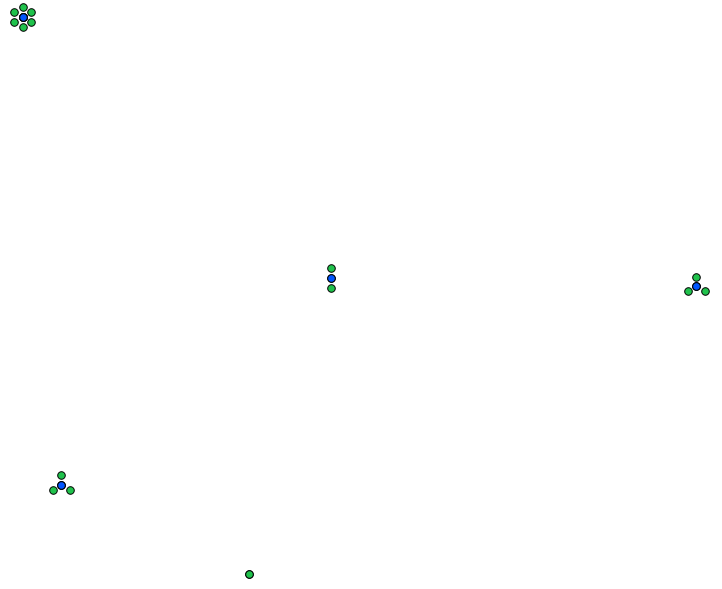
Script founds all points with same coordinates and then moves them in a circle with center in "original" position and using value of the "-d" option as radius. So script provides same result as "Point displacement" renderer in QGIS.
Here is result of the processing shapefile with this scrip (blue — original points, green — points after displacement, displacement distance ~10 m.).
QGIS plugin
Installation notes
Plugin is available via QGIS official repository. If you use QGIS 1.7.x, you should add it to the repositories list manually.
ShiftPoints is designed for QGIS 1.0.0 or higher and have no additional dependencies.
You can obtain sources with this command:
git clone https://github.com/alexbruy/shiftpoints.git
How does it work
After plugin installation and startup by clicking
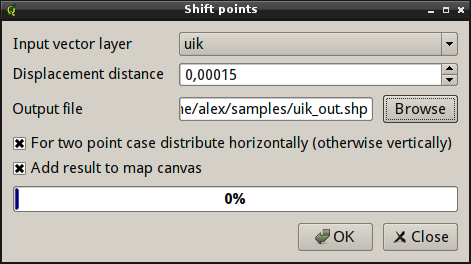
main window will appear:
Select input point layer with overlapped features from "Input vector layer" combobox. Set desired displacement distance using "Displacement distance" spinbox. IMPORTANT! displacement distance should be in same units as layer.
Enter output file name into "Output file" field. If checkbox "For two point case distribute horizontally (otherwise vertically)" is checked two overlapped points will be distributed horizontally, otherwise they will be distributed vertically. To load new shapefile as layer in project check "Add result to canvas".
Press "OK" button to start processing.
Contacts
If you want report a bug or want make suggestion — use bugtracker. Also if you have a question about the script or plugin usage, you can contact us directly.

