Raster classification with DTclassifier for QGIS: различия между версиями
| Строка 55: | Строка 55: | ||
[[Файл:dtclassifier-02.png|center]] | [[Файл:dtclassifier-02.png|center]] | ||
==== Selecting | ==== Selecting training datasets ==== | ||
You can select layers containing training data using comboboxes "Feature presence layer" and "Feature absence layer". These layers should contain spatial information on target object or phenomenon (presence) and all other areas (absence). These layers should be created in advance, before classification. You can create them directly in QGIS using all it's tools with vector and raster processing. You can learn more about creating and editing vector data in [http://gis-lab.info/docs/qgis QGIS User Guide]. | You can select layers containing training data using comboboxes "Feature presence layer" and "Feature absence layer". These layers should contain spatial information on target object or phenomenon (presence) and all other areas (absence). These layers should be created in advance, before classification. You can create them directly in QGIS using all it's tools with vector and raster processing. You can learn more about creating and editing vector data in [http://gis-lab.info/docs/qgis QGIS User Guide]. | ||
Текущая версия от 18:07, 14 января 2014
по адресу http://gis-lab.info/qa/dtclassifier-eng.html
Description and usage examples for new raster classification and change detection tool.
Supervised thematic raster classification is a fairly common task. Typically there are set of input rasters and set of training data, defining the target and all the rest (background) classes. After these data are gathered, we can use different techniques to build a classification: parametric and nonparametric. The first group assumes certain statistical distribution of the training data (e.g., normal), the second group don't make any of these assumptions and therefore is more flexible and less restrictive. There are several articles on this site describing the non-parametric classification of raster data using the decision tree in R and support vector machines method in imageSVM. In addition to proprietary solutions, there are opensource software, such OTB and GRASS which can be used to solve classification problems, however their toolbox of classification algorithms is limited and non-parametric methods are not well covered.
In most cases, classification requires using several applications and not well integrated with the GIS software, as there are no convenient tools for preparation and editing of training data sets, which as a result complicates process for average users.
DTclassifier (Decision Tree classifier) is a C++ plugin for QGIS, which provides simple streamlined interface and allows to perform all operations within QGIS. The plugin uses particular classification algorithm from well-known computer vision library OpenCV, namely decision trees.
This development is part of the project to facilitate monitoring of FSC (Forest Stewardship Council) certified forestry enterprises in Russia.
| Open source geospatial solutions |
Installation notes
The plugin sources and ready to run binary files for Windows are available.
Binary files
To work with plugin under Windows you need:
- download and install QGIS 1.8 or higher (read more)
- download the archive with plugin and necessary libraries. Note, that DTclassifier works with QGIS 1.8 only.
- (optionally) check md5 sum:
7622527e656373797080b4c40a9bb4f2 DTclassifier.7z
- extract archive into QGIS plugins directory (usually C:\OSGeo4W\apps\qgis-dev\plugins)
Linux binaries are also available. To work with plugin under Linux you need:
- download and install QGIS 1.8 or higher.If packages for your distribution are not available — you need to compile QGIS from source
- download the archive with plugin: 32-bit binary (download) сompiled under 32-bit Slackware 13.1 using OpenCV 2.3.1
- (optionally) check md5 sum:
b3089f69602b9b55652380728f7b2a3c dtclassifier-linux.tar.bz2
- extract archive into QGIS plugins directory (usually /usr/lib/qgis/plugins)
After installing you should run QGIS and enable the DTclassifier in Plugin Manager ("Modules → Manage plugins").
Source code
You can obtain sources (GNU GPL v2) from our SVN:
svn co http://svn.gis-lab.info/dtclassifier/trunk dtclassifier
You can also download sample data used in this article.
How does it work
After plugin is installed and started by clicking
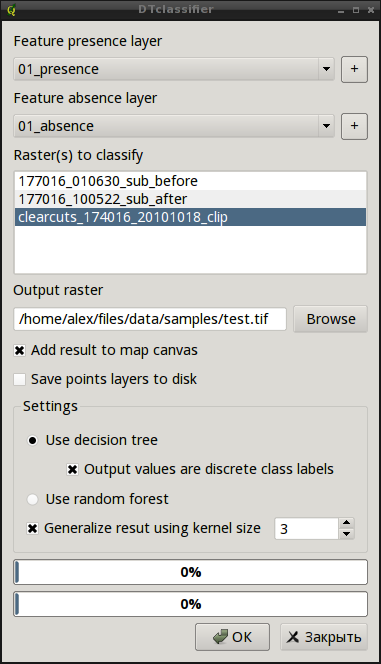
the main window will appear
Selecting training datasets
You can select layers containing training data using comboboxes "Feature presence layer" and "Feature absence layer". These layers should contain spatial information on target object or phenomenon (presence) and all other areas (absence). These layers should be created in advance, before classification. You can create them directly in QGIS using all it's tools with vector and raster processing. You can learn more about creating and editing vector data in QGIS User Guide.
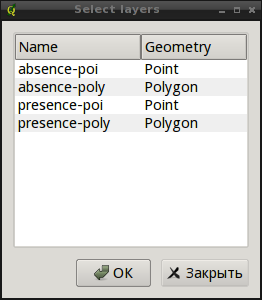
Plugin supports all basic geometry types (points, lines, polygons) in training datasets. "+" button after each combobox allows to select several layers at once and the geometry of these layers can be different.
Combobox works only if single training layer is used. If you select several layers, combobox becomes inactive and you need to press "+" again to return to single layer mode.
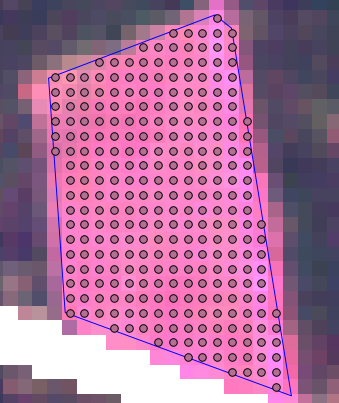
During the process all training layers are merged into single point shapefile. Point layers will be saved "as is", and polyline and polygon objects will be converted into points, to obtain points in each pixel inside polygon or at line.
Example for polygon geometry:
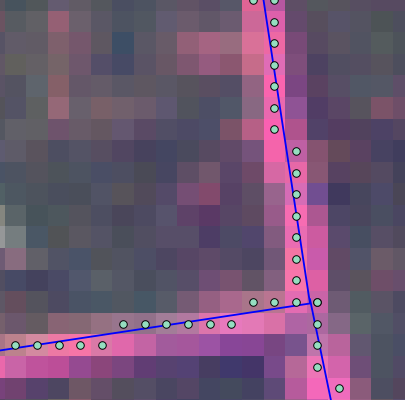
To find which points are falling on the line we use the next algorithm. Create buffer with 1/2 pixel width around a line; create point in the center of each pixel that fall into buffer, than select points that completely within the buffer zone.
Example for polyline geometry:
IMPORTANT! Proper training data — the key to success. You should be as careful as possible when selecting training layers. If the same layer is selected as both presence and absense, the classification result will be incorrect.
Selecting data to classify
In field "Raster(s) to classify" you can select raster that you want to classify. Multiple selection with Shift and Ctrl is supported, this may be used for change detection, when rasters "before" and "after" are processed. When multiple rasters are selected, the training data will be collected from each image.
IMPORTANT! If multiple rasters are selected make sure that drive where temporary folder is located has enough free space (free space size should be approximately equal to the double rasters size).
Use the "Output raster" filed to specify where to save classification result.
Additional settings
If you set the flag "Add result to map canvas" then classification result will be loaded into QGIS. Setting up the flag "Save point layer to disk" will force plugin to save training data into a point shapefile near to the output file. For each point in the file plugin pixel values and class are recorded. This data can be used to build the model and perform the classification with other software.
"Settings" group allows to customize classification process. Here you can select desired method: single decision tree ("Use decision tree") or random forest ("Use random forest"). Usually classification with random forest gives more accurate results. If single tree classification is selected, checkbox "Output values are discrete class labels" will be enabled. When checkbox checked, input train data will be interpreted as a set of discrete values (labels). If checkbox unchecked, then the input data will be treated as continuous values.
You can also activate the "smoothing" of classification results with a custom kernel size ("Generalize result using kernel size"). When this option is activated, plugin creates two output rasters: a classified and smoothed (the name contains the suffix "_smooth").
In addition to the classification results plugin saves tree used in the classification (in YAML format, the filename is formed from the name of the output file and the suffix "_tree").
After pressing "OK" button the extraction of training data begins, followed by training of the classifier and classification itself. Progress in the classification is displayed using two progressbars: the upper shows the progress of current operation and the bottom — overall progress.
Example: classification
In this example we will learn how DTclassifier can be used to solve one of the tasks of monitoring of forestry activities: detection of clearcuts using a single image.
Thematic classification process has several steps:
- remote sensing data acquisition and preparation
- collecting training data
- create model on training data
- apply model to the raster data and get results
Remote sensing data acquisition and preparation
First of all it is necessary to find and georeference rasters which we want to classify. Usually these are satellite imagery (e.g. Landsat), where we can find our targets. If you don't know where to obtain remote sensing data, we recommend that you read several articles describing the Landsat obtaining process via Glovis service and their further processing (i.e., merging of the individual bands into a single file).
If you want to reproduce the example, download this dataset with samples.
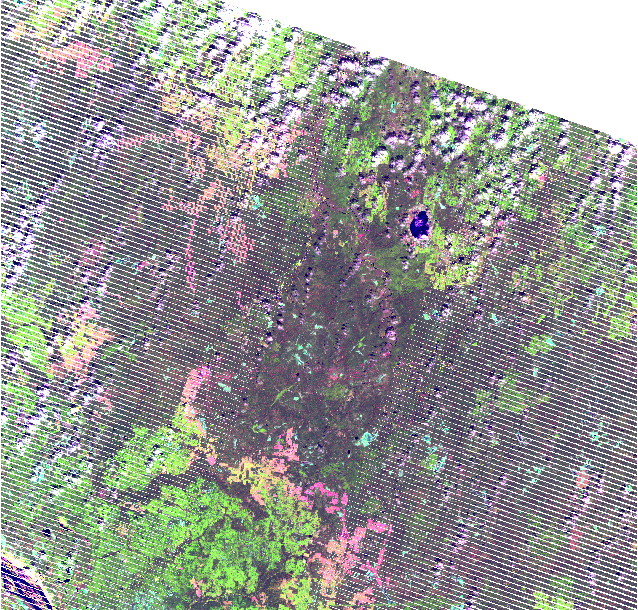
To demonstrate clearcuts detection we use raster after.tif with band combination 5-4-3, to make easier visualy detect clearcuts (pink on the screenshot).
Collecting training data
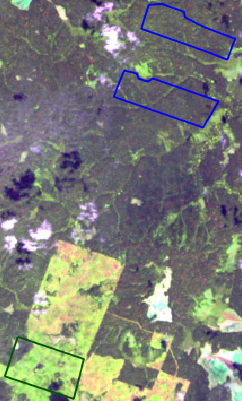
To construct a decision tree it is necessary to prepare training data (so-called "supervised learning") that contains objects of two classes: presence and absence of clearcuts.
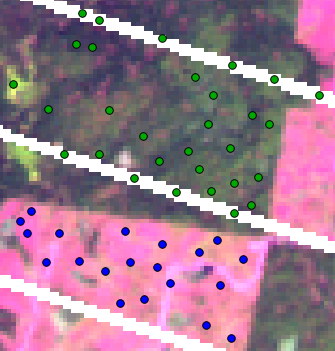
We will need at least two vector layers: one that shows samples of clearcuts, and the second — with places where there is none. So, we can create a two point layers and put dots in the right places (blue dots in the figure correspond to the clearcuts, green — no clearcuts).
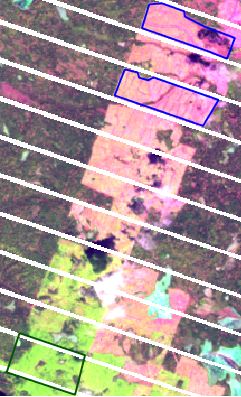
This method is not very convinient, as a result of classification depends on the amount of training data (more data, more accurate results) and selecting clearcuts using points is tedious. Therefore, it is better to create polygon layers and to digitize a few clearcuts, and do the same with the areas where there are none (blue color corresponds to clearcuts, green — no clearcuts).
Plugins supports all types of geometries (points, lines, polygons), so we can use multiple layers simultaneously. Load the layers with clearcuts presence-poly.shp, presence-poi.shp (polygons and points, respectively) and layers with background — absence-poly.shp, absence-poi.shp.
If checkbox "Save point layer to disk" is checked, a point layer created from the initial training layers will be saved for future use. For example, after saving an attribute table in the CSV format, you can perform a classification of the input raster with R (read more), and then compare the results.
Creation of a point layer and extraction of the raster pixel values will be performed in automatic mode, after the start of the classification process.
Classification
When training layers are created and the source raster layers are loaded we can proceed with analysis. Using "+" button near each combobox, specify the training data (presence of clearcuts — presence layer; background — absence layer), in the raster list select after.tif, and finally specify the path where to save the results.
Because the raster pixel values are continuous values, the "Output values are discrete class labels" checkbox do not need to be activated. But it is recommended to enable smoothing ("Generalize result using kernel size"): this will remove remove "noise" and make the result clearer. The default kernel size (3) in most cases is sufficient.
Start a classification by clicking on "OK" button. After a short wait we get two new rasters.
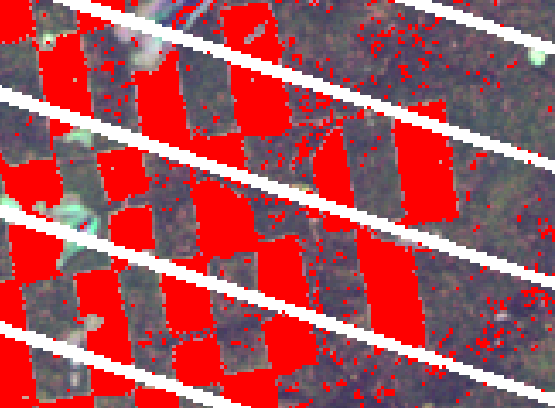
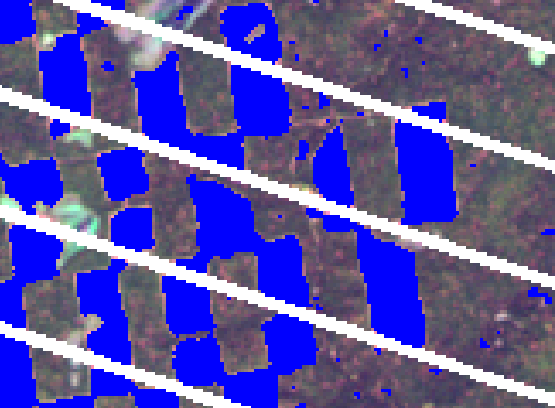
A fragment of classified raster:
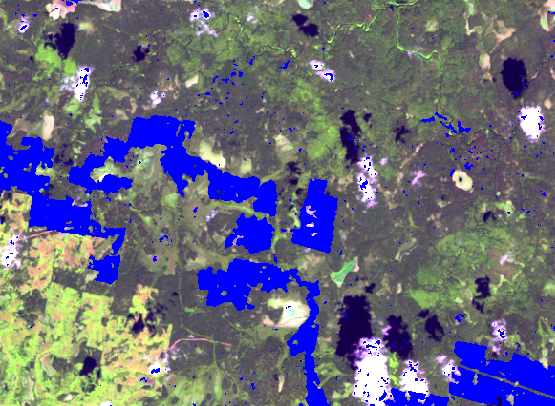
It is evident that many individual pixels were classified as clearcuts, though in fact they do not belong to them. To eliminate this "noise" can use smoothing. Below you can see the same fragment of the output image, but after smoothing:
Here we can see that output is clearer and clearcuts boundaries becomes more precise.
Example: change detection
Another problem, which can be solved with a DTclassifier is change detection. The essence of this analysis is that we have the series of rasters (in the simplest case — a pair) before and after an event. Using them we look for the changed areas.
The main steps in this case are the same as in thematic classification, so we will no list them again, but will demostrate how to performed change detection with DTclassifier. As input data we will use same sample dataset as in previous example.
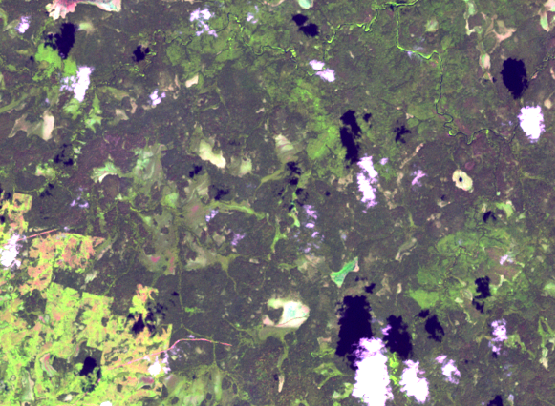
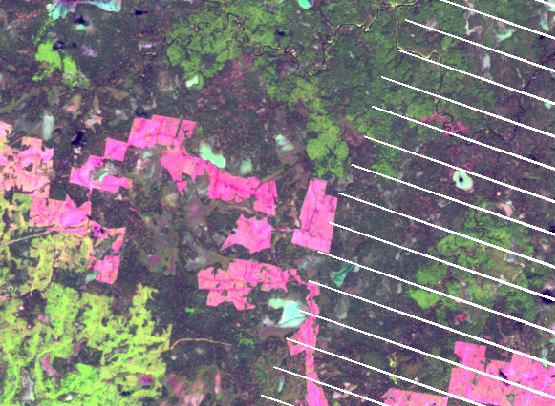
First, create new empty project in QGIS and load both rasters: before.tif and after.tif. As the name implies, image before.tif is taken before event (in our case — forest clearcutting), and raster after.tif — after this event. So we can detect clearcuts appeared in the interval between shots «before» and «after».
Collecting of training data is slightly different from the previous example. In case of thematic classification we select data using feature presense / feature absence criteria, but now the data are selected using two raster images. In the changes layer (presence) we digitize areas in which feature is present in the raster "after", but not in the raster "before".
Absence layers are dizitized as in the previous example from the areas where there are no cuttings on both images.
In this example we will use as training data only polygon layers presence-poly.shp and absence-poly.shp. As usual you can use multiple layers if necessary.
Now open DTclassifier, in comboboxes "Feature presence layer" and "Feature absence layer" select presence and absence layers respectively. In the input rasters list using SHIFT to select both rasters before and after, also select path to output raster. Classification settings can be left unchanged. Press «OK» to run analysis and wait for it to finish.
Here is fragment of the raster before clearcuts happened:
Same fragment after:
Analysis result overlayed on the before raster:
Conclusion
DTClassifier is a simple to use plugin that implements advanced method for raster classification and change detection. Integration with QGIS allows you perform all operations including training data collection, tree-building and classification. Use of computer vision library OpenCV ensures high performance.
Contacts
If you want report a bug, make suggestion or have a question about the plugin, please contact us.
| Open source geospatial solutions |
