Raster algebra in QGIS with RasterCalc: различия между версиями
Voltron (обсуждение | вклад) Нет описания правки |
Voltron (обсуждение | вклад) Нет описания правки |
||
| Строка 90: | Строка 90: | ||
=== Contacts === | === Contacts === | ||
If you want report a bug or want make suggestion — use [http://hub.qgis.org/projects/rastercalc bugtracker]. Also if you have a question about plugin usage, you can contact the [http://wiki.gis-lab.info/w/%D0%A3%D1%87%D0%B0%D1%81%D1%82%D0%BD%D0%B8%D0%BA:Voltron developer] directly (more [http://gis-lab.info/contacts.html contacts]). | If you want report a bug or want make suggestion — use [http://hub.qgis.org/projects/rastercalc bugtracker]. Also if you have a question about plugin usage, you can contact the [http://wiki.gis-lab.info/w/%D0%A3%D1%87%D0%B0%D1%81%D1%82%D0%BD%D0%B8%D0%BA:Voltron developer] directly (more [http://gis-lab.info/contacts-eng.html contacts]). | ||
=== Links === | === Links === | ||
Версия от 08:49, 22 июля 2012
по адресу http://gis-lab.info/qa/rastercalc-eng.html
Raster algebra in QGIS.
RasterCalc is a simple and powerfull raster calculator that is a plugin for free and opensource GIS — QGIS.
Installation notes
Plugin is available in official repository.
The plugin is designed for QGIS version 1.3.0 and higher. You will need the following additional Python modules installed:
- pyparsing — parsing library
- osgeo.gdal — Python bindings for GDAL
If this modules are not installed in your system, you'll see error message on plugin startup, asking for one this modules.
All necessary packages are available in OSGeo4W installer. You can find them in Libs category (pyparsing and gdal-python packages). If you use standalone installer you need to download and install pyparsing.
You can obtain sources from our SVN:
svn co http://svn.gis-lab.info/rastercalc ractercalc
How does it work
After you've installed the plugin and started it by clicking toolbar button in the main window
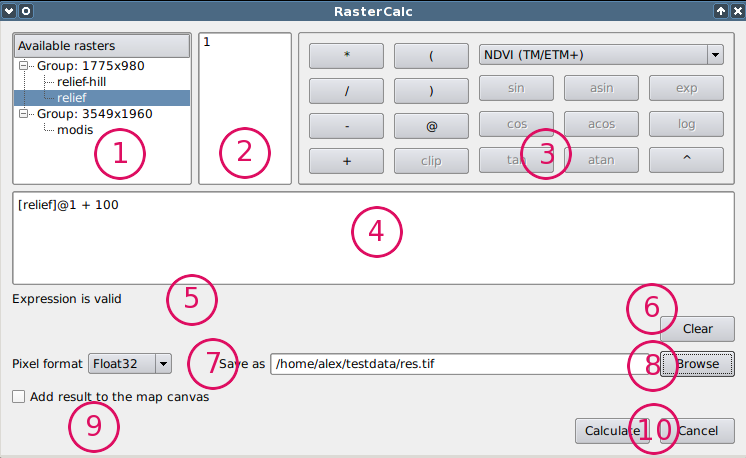
calculator will appear
Numbers denote:
- List of rasters. Rasters are grouped by size.
- Bands list of selected raster. Filled automatically when raster is selected.
- Buttons for quick functions. Presets dropdown list is also here.
- Expression area. Your expression is displayed in this area. Copy-paste operations are supported.
- Message bar. Displays errors, warnings and status messages.
- Clear button to erase expression area.
- Output pixel format dropdown list.
- Output raster filename.
- Checkbox to load resulting raster in map canvas.
- Buttons for run calculate and close window.
Expression format is traditional, same as in mathematics: there is support of parentheses and included parentheses. Raster names must be in square brackets ("[]"), followed by symbol "@" and number which denotes band number. It is possible to insert raster name automaticaly by doublecliking on it's name in raster list, raster with first band will be inserted. Inserting raster name with different band number is possible by doubleclicking on the band number in bands list.
Some common expressions are saved as presets. When preset is selected in dropdown list it will be inserted in expression area and sample raster names must be replaced with real raster names.
Plugin does some checking during expression composing. If errors is found a message will appear on the message bar and calculate button will be disabled.
Using quick access buttons you can insert:
- arithmetics operations (+, -, *, /)
- trigonometric functions (sin, cos, tan, asin, acos, atan)
- natural logarithm (log), exponent (exp) and exponentiation (^)
- parentheses, band number operator
Also implemented, but not available with quick access buttons (you need to enter it manually):
- comparison operators (<, >, =, !=, <=, >=)
- conditional statements (lt — less, gt — greater, eq — equal, ne — not equal, le — less or equal, ge — greater or equal)
Comparison operators allow to perform pixel-wise compare raster band with some value or another raster band. The result will be a raster with all pixels that match condition set to 1 and all other pixels set to 0.
Conditional statements are further development of comparison operators. Statement has three arguments:
- raster to compare;
- value to compare with;
- value used for replacement.
A value or any raster band can be used as second and third argument (in this case pixel-wise compare and/replace is used) or expression.
Consider the use of conditional statements with examples. Statement:
le( [relief]@1, 50, 200 )
should be read as: all pixels in first band of the relief raster with value less or equal then 50, should be replaced with value 200.
More examples:
eq( [relief]@1, [mask]@4, 150 )
all pixels in first band of the relief raster with value equal to the appropriate pixels in fourth band of the mask raster, should be replaced with value 150.
gt( [relief]@1, [mask]@4, [base]@2 )
all pixels in first band of the relief raster, with value greater or equal to the appropriate pixels in fourth band of the mask raster, should be replaced with the appropriate pixels from second band of the base raster.
Contacts
If you want report a bug or want make suggestion — use bugtracker. Also if you have a question about plugin usage, you can contact the developer directly (more contacts).
