OrbView-3 Orthorectification: различия между версиями
Zverik (обсуждение | вклад) (начал перевод) |
м (переименовал Orbview3 Orthorectification в OrbView-3 Orthorectification) |
||
| (не показано 5 промежуточных версий 3 участников) | |||
| Строка 1: | Строка 1: | ||
[[ | {{Статья|Черновик}} | ||
[[Каталог данных OrbView-3|OrbView-3]] imagery is not georeferenced and not orthorectified. To make it useful, one needs to do both. | |||
== | === Brief instructions === | ||
There are three easy steps to get a small 8bit raster images from the source | There are three easy steps to get a small 8bit raster images from the source GeoTIFFs: | ||
# Download required SRTM regions as GeoTIFF, for imagery orthorectification. To do that: | # Download required SRTM regions as GeoTIFF, for imagery orthorectification. To do that: | ||
| Строка 10: | Строка 11: | ||
#* unpack them: | #* unpack them: | ||
for i in srtm*zip; do yes|unzip $i; done | for i in srtm*zip; do yes|unzip $i; done | ||
# For convinience let's | # For convinience let's merge all SRTM GeoTIFF files into a single raster image: | ||
gdalbuildvrt srtm.vrt srtm*tif | gdalbuildvrt srtm.vrt srtm*tif | ||
# To make a small 8bit GeoTIFF from the source files, run the following command: | # To make a small 8bit GeoTIFF from the source files, run the following command: | ||
| Строка 58: | Строка 59: | ||
We have: a shape-file with coverage, jpg with "preview" (georeferenced!), TIFF file itself with data, a file with RPC conversion parameters (scene_rpc.txt), and a scene.pvl file, which contains something like a description of the data and its parameters. | We have: a shape-file with coverage, jpg with "preview" (georeferenced!), TIFF file itself with data, a file with RPC conversion parameters (scene_rpc.txt), and a scene.pvl file, which contains something like a description of the data and its parameters. | ||
If you open that TIFF file | If you open that TIFF file with GDAL/QGIS, you won't find any georeferencing. | ||
Let's examine it: | Let's examine it: | ||
<pre> | <pre> | ||
| Строка 97: | Строка 98: | ||
</pre> | </pre> | ||
As we expected, there are no referencing information in the file. But GDAL has succesfully read RPC (rational polynomial coefficients), which are needed for correct transformation and referencing. You can read in detail about orthorectification using RPC via links from the discussion board thread: http://gis-lab.info/forum/viewtopic.php?p=27889#p27889. If | As we expected, there are no referencing information in the file. But GDAL has succesfully read RPC (rational polynomial coefficients), which are needed for correct transformation and referencing. You can read in detail about orthorectification using RPC via links from the discussion board thread: http://gis-lab.info/forum/viewtopic.php?p=27889#p27889. If gdalinfo command didn't print RPC metadata, check the version: you need GDAL not older than 1.8.1. | ||
For correct orthorectification we need RPC parameters and information about altitude above geoid. There was something about altitude in the gdalinfo output (those who are interested can dig into that). Let's go bruteforce: | For correct orthorectification we need RPC parameters and information about altitude above geoid. There was something about altitude in the gdalinfo output (those who are interested can dig into that). Let's go bruteforce: | ||
| Строка 140: | Строка 141: | ||
Well, there are some good-looking georeferencing data (in geodetic CS though). Let's open the file in QGIS... Hm, we hit the target region, that's for sure. But the referencing is very rough: almost hundred meters off. | Well, there are some good-looking georeferencing data (in geodetic CS though). Let's open the file in QGIS... Hm, we hit the target region, that's for sure. But the referencing is very rough: almost hundred meters off. | ||
Google says that for precise referencing one should use DEM data (digital elevation model). Ok. Let's head to Aster GDEM website (http://www.gdem.aster.ersdac.or.jp/index.jsp), register, open Search page. Choose "Select tiles by shapefile", feed it a coverage file scene.shp, download results, unpack. There are several (in this case — 4) files with DEM data, named like ASTGTM2_N55E026_dem.tif (one tile corresponds to one "SQUARE" of degree grid). Alas, neither GDAL nor ENVI EX can work with several DEM files for a single scene. So we join them first using gdal_merge.py into a single GeoTIFF: | |||
<pre> | <pre> | ||
$ gdal_merge.py -o DEM_merged.tif ASTGTM2_N5[45]E02[67]/*_dem.tif | $ gdal_merge.py -o DEM_merged.tif ASTGTM2_N5[45]E02[67]/*_dem.tif | ||
| Строка 146: | Строка 147: | ||
</pre> | </pre> | ||
The documentation on gdalwarp tells that to orthorectificate an image one should specify DEM file with a -to 'RPC_DEM=DEM_merged.tif'. Let's try: | |||
<pre> | <pre> | ||
$ gdalwarp -rpc -to 'RPC_DEM=/home/ftp/maps/GDEM/DEM_merged.tif' 3v050909p0000897861a520004700712m_001631680.tif test.tif | $ gdalwarp -rpc -to 'RPC_DEM=/home/ftp/maps/GDEM/DEM_merged.tif' 3v050909p0000897861a520004700712m_001631680.tif test.tif | ||
| Строка 154: | Строка 155: | ||
</pre> | </pre> | ||
Open the result in QGIS — and that's much better! But we still got an error of about 10 meters. Reasons for that are unknown at the moment. | |||
For transforming into another coordinate system just add -t_srs proj_definition. If gdalwarp refuses to transform anything, download neighbouring GDEM tiles — there's a possibility that "margins" in the transformed raster are overlapping. | |||
But if you feed a source raster image and DEM to a software ENVI EX (sadly, commercial and only for Windows), after a prolonged processing it would return nearly perfectly georeferenced file in an UTM projection for a given zone. You can see an example here: http://latlon.org/~jek/osm/ov3-sample.jpg . If you know how to archieve similar results with GDAL — please share. | |||
Текущая версия от 05:32, 27 января 2012
OrbView-3 imagery is not georeferenced and not orthorectified. To make it useful, one needs to do both.
Brief instructions
There are three easy steps to get a small 8bit raster images from the source GeoTIFFs:
- Download required SRTM regions as GeoTIFF, for imagery orthorectification. To do that:
- on the http://srtm.csi.cgiar.org/SELECTION/inputCoord.asp page look at the picture and write down identificators or rows and columns you need.
- download zip files with those numbers from http://gis-lab.info/data/srtm-tif
- unpack them:
for i in srtm*zip; do yes|unzip $i; done
- For convinience let's merge all SRTM GeoTIFF files into a single raster image:
gdalbuildvrt srtm.vrt srtm*tif
- To make a small 8bit GeoTIFF from the source files, run the following command:
gdalwarp -co TILED=YES -co JPEG_QUALITY=85 -co COMPRESS=JPEG -multi -dstnodata 0 -srcnodata 0 -overwrite -ot byte -t_srs epsg:3857 -rpc -to 'RPC_DEM=/home/kom/Downloads/srtm.vrt' 3v050901p0000883761a520004300642m_001631911.tif 3v050901p0000883761a520004300642m_001631911.rec.tif
TODO:
- Research how to do an "internal nodata mask", to get more accurate image edges;
Extended instructions
In this section other methods will be discussed.
If you notice the author to be missing some things very obvious for a specialist (the author is amateur), please fix it.
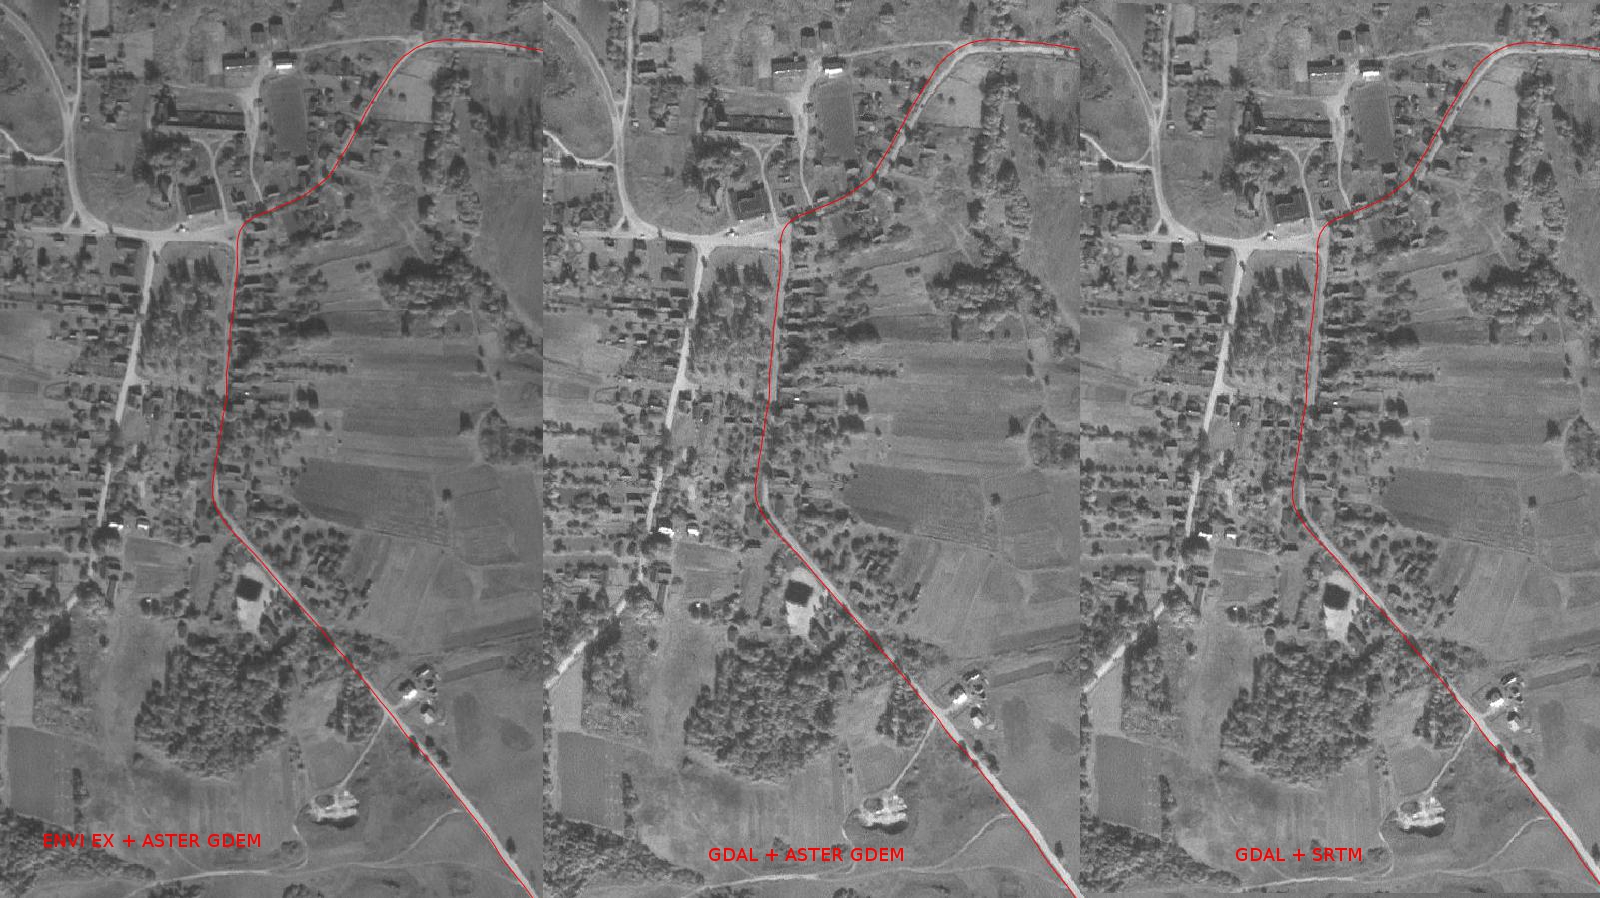
For those who don't like to read long explanations with examples - short summary:
- gdalwarp without DEM - very rough referencing.
- gdalwarp with DEM - better, but still not accurate.
- ENVI EX with DEM - almost perfect, but expensive.
A comparison of results from ENVI EX + Aster, GDAL + aster and GDAL + SRTM: http://latlon.org/~jek/osm/ov3-ortho-comparison.jpg
For a start, let's take a look inside ZIP-archive with a single scene, downloaded from the USGS website:
$ ls -1 3v050909p0000897861a520004700712m_001631680*
3v050909p0000897861a520004700712m_001631680_aoi.dbf
3v050909p0000897861a520004700712m_001631680_aoi.prj
3v050909p0000897861a520004700712m_001631680_aoi.shp
3v050909p0000897861a520004700712m_001631680_aoi.shx
3v050909p0000897861a520004700712m_001631680.att
3v050909p0000897861a520004700712m_001631680.dbf
3v050909p0000897861a520004700712m_001631680.eph
3v050909p0000897861a520004700712m_001631680.jgw
3v050909p0000897861a520004700712m_001631680.jpg
3v050909p0000897861a520004700712m_001631680.prj
3v050909p0000897861a520004700712m_001631680.pvl
3v050909p0000897861a520004700712m_001631680_rpc.txt
3v050909p0000897861a520004700712m_001631680.shp
3v050909p0000897861a520004700712m_001631680.shx
3v050909p0000897861a520004700712m_001631680_src.dbf
3v050909p0000897861a520004700712m_001631680_src.prj
3v050909p0000897861a520004700712m_001631680_src.shp
3v050909p0000897861a520004700712m_001631680_src.shx
3v050909p0000897861a520004700712m_001631680.tif
We have: a shape-file with coverage, jpg with "preview" (georeferenced!), TIFF file itself with data, a file with RPC conversion parameters (scene_rpc.txt), and a scene.pvl file, which contains something like a description of the data and its parameters.
If you open that TIFF file with GDAL/QGIS, you won't find any georeferencing. Let's examine it:
$ gdalinfo 3v050909p0000897861a520004700712m_001631680.tif
Warning 1: TIFFReadDirectory:Unknown field with tag 34000 (0x84d0) encountered
Driver: GTiff/GeoTIFF
Files: 3v050909p0000897861a520004700712m_001631680.tif
       3v050909p0000897861a520004700712m_001631680_rpc.txt
Size is 8016, 25600
Coordinate System is `'
Metadata:
  TIFFTAG_MINSAMPLEVALUE=0
  TIFFTAG_MAXSAMPLEVALUE=2047
Image Structure Metadata:
  INTERLEAVE=BAND
RPC Metadata:
  LINE_OFF= +012800.00 pixels
  SAMP_OFF= +004008.00 pixels
  LAT_OFF= +55.02030000 degrees
  LONG_OFF= +027.04780000 degrees
  HEIGHT_OFF= +0179.000 meters
  LINE_SCALE= +012800.00 pixels
  SAMP_SCALE= +004008.00 pixels
  LAT_SCALE= +00.12380000 degrees
  LONG_SCALE= +000.06850000 degrees
  HEIGHT_SCALE= +0300.000 meters
  LINE_NUM_COEFF= -2.104832000000000E-03  -1.642616000000000E-02  -1.027459000000000E+00  +4.182002500000000E-03  -1.902795200000000E-03  +1.614313300000000E-05  +4.786355800000000E-04  -2.127866900000000E-04  +6.958830700000000E-03  -2.260572200000000E-06  -2.225955200000000E-07  -3.746937200000000E-07  +4.648645700000000E-04  -1.801288800000000E-08  +5.140758300000000E-06  +7.566147900000000E-04  -5.452440900000000E-07  +1.394079900000000E-07  -1.828159600000000E-05  +2.421558100000000E-09
  LINE_DEN_COEFF= +1.000000000000000E+00  -5.006651300000000E-04  -1.457830900000000E-03  +6.037474400000000E-04  +0.000000000000000E+00  +0.000000000000000E+00  +0.000000000000000E+00  +0.000000000000000E+00  +0.000000000000000E+00  +0.000000000000000E+00  +0.000000000000000E+00  +0.000000000000000E+00  +0.000000000000000E+00  +0.000000000000000E+00  +0.000000000000000E+00  +0.000000000000000E+00  +0.000000000000000E+00  +0.000000000000000E+00  +0.000000000000000E+00  +0.000000000000000E+00
  SAMP_NUM_COEFF= +3.145351000000000E-04  +1.023427000000000E+00  -3.439455200000000E-03  +1.730013100000000E-02  +5.102439600000000E-03  +1.245288300000000E-03  -1.578704500000000E-03  -2.939111200000000E-03  -2.317010900000000E-04  +2.847267800000000E-05  +2.422610700000000E-05  +6.633964600000000E-06  -1.694999000000000E-03  +6.913555700000000E-07  +1.531221300000000E-04  +1.486522300000000E-05  +1.555096200000000E-07  -5.617327200000000E-06  -2.950330800000000E-05  +1.262439900000000E-08
  SAMP_DEN_COEFF= +1.000000000000000E+00  -6.035266200000000E-04  +6.161647000000000E-03  +6.386015900000000E-04  +0.000000000000000E+00  +0.000000000000000E+00  +0.000000000000000E+00  +0.000000000000000E+00  +0.000000000000000E+00  +0.000000000000000E+00  +0.000000000000000E+00  +0.000000000000000E+00  +0.000000000000000E+00  +0.000000000000000E+00  +0.000000000000000E+00  +0.000000000000000E+00  +0.000000000000000E+00  +0.000000000000000E+00  +0.000000000000000E+00  +0.000000000000000E+00
Corner Coordinates:
Upper Left  (    0.0,    0.0)
Lower Left  (    0.0,25600.0)
Upper Right ( 8016.0,    0.0)
Lower Right ( 8016.0,25600.0)
Center      ( 4008.0,12800.0)
Band 1 Block=8016x1 Type=UInt16, ColorInterp=Gray
As we expected, there are no referencing information in the file. But GDAL has succesfully read RPC (rational polynomial coefficients), which are needed for correct transformation and referencing. You can read in detail about orthorectification using RPC via links from the discussion board thread: http://gis-lab.info/forum/viewtopic.php?p=27889#p27889. If gdalinfo command didn't print RPC metadata, check the version: you need GDAL not older than 1.8.1.
For correct orthorectification we need RPC parameters and information about altitude above geoid. There was something about altitude in the gdalinfo output (those who are interested can dig into that). Let's go bruteforce:
$ gdalwarp -rpc 3v050909p0000897861a520004700712m_001631680.tif test.tif
Warning 1: TIFFReadDirectory:Unknown field with tag 34000 (0x84d0) encountered
Creating output file that is 12925P x 23537L.
Warning 1: TIFFReadDirectory:Unknown field with tag 34000 (0x84d0) encountered
Processing input file 3v050909p0000897861a520004700712m_001631680.tif.
0...10...20...30...40...50...60...70...80...90...100 - done.
Now we'll check once more if the information was written into the resulting file:
$ gdalinfo test.tif
Driver: GTiff/GeoTIFF
Files: test.tif
       test_rpc.txt
Size is 12925, 23537
Coordinate System is:
GEOGCS["WGS 84",
    DATUM["WGS_1984",
        SPHEROID["WGS 84",6378137,298.257223563,
            AUTHORITY["EPSG","7030"]],
        AUTHORITY["EPSG","6326"]],
    PRIMEM["Greenwich",0],
    UNIT["degree",0.0174532925199433],
    AUTHORITY["EPSG","4326"]]
Origin = (26.981501010426538,55.143013345911761)
Pixel Size = (0.000010399352347,-0.000010399352347)
Metadata:
  AREA_OR_POINT=Area
Image Structure Metadata:
  INTERLEAVE=BAND
Corner Coordinates:
Upper Left  (  26.9815010,  55.1430133) ( 26d58'53.40"E, 55d 8'34.85"N)
Lower Left  (  26.9815010,  54.8982438) ( 26d58'53.40"E, 54d53'53.68"N)
Upper Right (  27.1159126,  55.1430133) ( 27d 6'57.29"E, 55d 8'34.85"N)
Lower Right (  27.1159126,  54.8982438) ( 27d 6'57.29"E, 54d53'53.68"N)
Center      (  27.0487068,  55.0206286) ( 27d 2'55.34"E, 55d 1'14.26"N)
Band 1 Block=12925x1 Type=UInt16, ColorInterp=Gray
Well, there are some good-looking georeferencing data (in geodetic CS though). Let's open the file in QGIS... Hm, we hit the target region, that's for sure. But the referencing is very rough: almost hundred meters off.
Google says that for precise referencing one should use DEM data (digital elevation model). Ok. Let's head to Aster GDEM website (http://www.gdem.aster.ersdac.or.jp/index.jsp), register, open Search page. Choose "Select tiles by shapefile", feed it a coverage file scene.shp, download results, unpack. There are several (in this case — 4) files with DEM data, named like ASTGTM2_N55E026_dem.tif (one tile corresponds to one "SQUARE" of degree grid). Alas, neither GDAL nor ENVI EX can work with several DEM files for a single scene. So we join them first using gdal_merge.py into a single GeoTIFF:
$ gdal_merge.py -o DEM_merged.tif  ASTGTM2_N5[45]E02[67]/*_dem.tif
0...10...20...30...40...50...60...70...80...90...100 - done.
The documentation on gdalwarp tells that to orthorectificate an image one should specify DEM file with a -to 'RPC_DEM=DEM_merged.tif'. Let's try:
$ gdalwarp -rpc -to 'RPC_DEM=/home/ftp/maps/GDEM/DEM_merged.tif'  3v050909p0000897861a520004700712m_001631680.tif test.tif
Warning 1: TIFFReadDirectory:Unknown field with tag 34000 (0x84d0) encountered
Processing input file 3v050909p0000897861a520004700712m_001631680.tif.
0...10...20...30...40...50...60...70...80...90...100 - done.
Open the result in QGIS — and that's much better! But we still got an error of about 10 meters. Reasons for that are unknown at the moment.
For transforming into another coordinate system just add -t_srs proj_definition. If gdalwarp refuses to transform anything, download neighbouring GDEM tiles — there's a possibility that "margins" in the transformed raster are overlapping.
But if you feed a source raster image and DEM to a software ENVI EX (sadly, commercial and only for Windows), after a prolonged processing it would return nearly perfectly georeferenced file in an UTM projection for a given zone. You can see an example here: http://latlon.org/~jek/osm/ov3-sample.jpg . If you know how to archieve similar results with GDAL — please share.
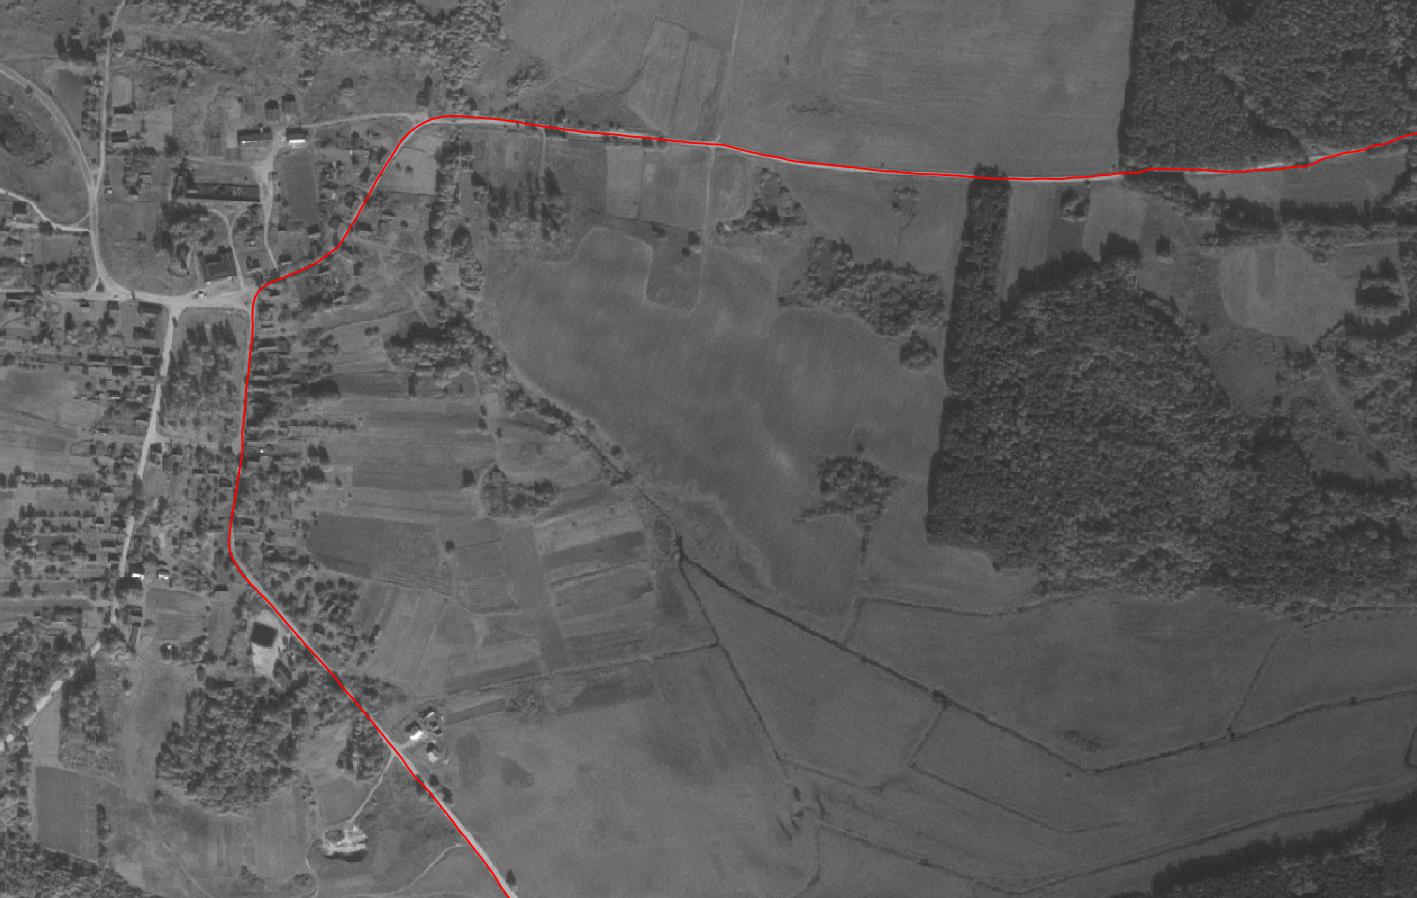